Curriculum
Differentiating by curriculum:

CONTENT
Content refers to what a student should come to know, understand, and be able to do as the result of a segment of study, or to how the student will gain access to that knowledge. (Tomlinson, C. A. p. 10)
A district may have a list of objectives, content that are expected for all students at a certain grade level, so there is not much variation in content however the materials could be used to differentiate instruction. (Burden, P. R., Byrd, D. M. p. 43)
Teachers have several different options to differentiate by content:
(Burden, P. R., Byrd, D. M. p. 43-44)
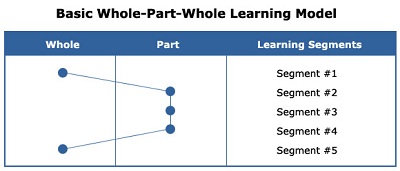
Whole-Part-Whole
WPW learning model
As can be seen in the chart, learners are exposed to the first “whole,” in which they are prepared for new instruction by being presented a “mental scaffolding”—the learning objectives and building-block concepts placed within the larger framework of the topic. This clear, learner-oriented introduction also serves to motivate learners and provide context for learning.
Then instruction focuses on the “parts”— what has been defined as the details of knowledge, expertise, and activity. After learners have mastered the specific, structured material, it is time to return to the “whole.” The second “whole” helps learners place their newly-mastered skills in context. In many cases the whole cannot truly be understood (or, in the case of skills, performed) without an understanding and proficiency of the individual parts, so the return to the whole allows the learner a second chance to arrive at a more nuanced understanding of the whole concept. The other side of this would be to start with the parts and build a whole. (MLW Editor)
- Whole-Part v. Part-Whole Approaches
- Reading level
- Materials
- Concepts & Principle v. Minute Facts
- In-depth projects v. general lessons
- Student readiness
(Burden, P. R., Byrd, D. M. p. 43-44)
Whole-Part-Whole
WPW learning model
As can be seen in the chart, learners are exposed to the first “whole,” in which they are prepared for new instruction by being presented a “mental scaffolding”—the learning objectives and building-block concepts placed within the larger framework of the topic. This clear, learner-oriented introduction also serves to motivate learners and provide context for learning.
Then instruction focuses on the “parts”— what has been defined as the details of knowledge, expertise, and activity. After learners have mastered the specific, structured material, it is time to return to the “whole.” The second “whole” helps learners place their newly-mastered skills in context. In many cases the whole cannot truly be understood (or, in the case of skills, performed) without an understanding and proficiency of the individual parts, so the return to the whole allows the learner a second chance to arrive at a more nuanced understanding of the whole concept. The other side of this would be to start with the parts and build a whole. (MLW Editor)
PROCESS
Includes the instructional activities or approaches used to help students learn the curriculum. Process is how students come to make sense of and understand the key facts, concepts, generalizations and skills of a subject.
Teachers have several options if they want to differentiate by process:
(Burden, P. R., Byrd, D. M. p. 44-45)
*an effective activity involves a student using an essential skill to understand an essential idea, and the activity is clearly focused on a learning goal.
Acceleration:
Acceleration simply means accelerating a student through the curriculum at a rate that places them ahead of where they would be in regular school curriculum. Example: If a student already has a firm grasp of the concepts you are teaching her in math then it would be reasonable to bring concepts from a higher grade level. When accelerating students standards must be examined and the teacher should make sure to notify the students following teacher, so that the student does not relearn content.
Pacing:
"Pacing a lesson so its nearly seamless takes expertise and practice -- and can be one of the greatest challenges for new teachers. For those more seasoned out there, here's a scenario many of us can relate to from the early days: way too much time for one learning activity, while not enough for another and clunky transitions in between."
Also on the teacher plate when it comes to instructional decisions that influence pacing? How best to chunk and scaffold content so it's grade-level appropriate and then deciding on the best instructional mode.
So let's take a look at the essentials when it comes to pacing the lesson and the learning:
1. Create a Sense of Urgency. The true art of pacing lies in creating a sense of urgency and also not leaving your students in the dust. Think diligent pace but not frenetic. This pacing feels just right to most learners in the room.
Using a timer on your desk can help create that "we are on the clock" feeling -- while moving steadily ahead proving ample wait/think time along the way. If a teacher question is asked of the whole group, don't expect an answer the first second or two, or three. Count to five when asking those particularly challenging questions. Sometimes we need to slow down in order to move the learning in the room forward.
2. Make Goals Clear. One way to avoid a clunky lesson pace is to make sure the learners know exactly what they are learning and doing for the day. "Our mission today is to discover... . We will be doing this by... ." Keep students focused as you transition from one learning activity to another, announcing how much closer they are to accomplishing the day's goal.
3. Have Smooth Transitions. Speaking of transitions, good ones demonstrate purposeful pacing and knowing next moves. Be thinking two steps ahead of the next activity, and begin setting up for the next activity without finishing the last. While students are completing one piece of the learning, pass out any materials, set up the projector, or have instructional notes in place so that there's little to no dead time between one learning activity to the next.
4. Be Sure Materials Are Ready. Doing this will let you keep the flow going. Have handouts, markers, scissors, and construction paper all in place. Many teachers create small supply containers of materials that include glue stick, scissors, highlighters, sticky notes, etc. and place it in the center of each collection of desks or team table. Each group can elect a Supplies Captain who keeps inventory and rounds up contents at the end of class time.
Photocopying can be the bane of the teacher's day. Do you really need to have the quiz or the writing prompt on individual copy paper? Can it be displayed on the projector screen instead? Can there be just one copy on the group table for all to look at? (Less passing out and collecting saves time and keeps the focus on the task at hand.)
5. Present Instructions Visually. This helps keep that pace uninterrupted. For each set of instructions, write them ahead of time on the board or have a slide in your PowerPoint or Prezi. If you are relying on giving oral directions only, think of those students that have poor listening skills: "What are we doing again?" What do we do after this?" The energy and time you take to make the instructions visible will pay off.
6. Check for Understanding. Taking time to see where your students are during the lesson and adjusting accordingly means formative assessments play a key role in pacing.
Pair and share creates energy in the room following direct instruction. Keep it in short spurts, breaking up every five to seven minutes of new information with "turn and talk with your elbow partner." Walk around the room and listen in to gauge understanding. These pauses for students to talk with each other can be as brief as 45 seconds. Also, use non-verbal quickies like thumbs up/thumbs down to see where students are and assess if more time or re-teaching is needed.
7. Choose Most Effective Type of Teaching. How will I get this new information to my students? Teachers must ask themselves this question continually when lesson planning. Sometimes new information is so new that students need to first see a visual representation and then require some information directly from their teacher to think about. Other times, it's best to set up a situation connecting to student schema and then group work to follow. Deciding the instructional mode (direct, student-centered, or facilitation) can be as important as choosing the content.
When that pacing seems off, is it time to switch the mode of delivery? Do they need a mini-lecture to clarify some misconceptions? Might a re-energizing activity be necessary, like a choral reading or class A-Z line up? Use a variety of activities with different formats to keep that flow and rhythm in the room.
How do you set up lessons so they flow? What pacing tips might you like to offer up that work well with your students?
(Alber)
Note: This is much more of an instructional strategy however, I included it on the curriculum tab because I wanted to keep acceleration and pacing together.
A pacing guide:
A pacing guide is sometimes referred to as a curriculum map, scope and sequence, standards schedule, instructional calendar, or road map. It is specific to a particular content area and level (e.g., 9th grade Algebra 1) and details when particular content standards should be taught and/or assessed. While still offering teachers flexibility on how to teach, its integration with common assessments is crucial to judging student progress (e.g., to turn "Students didn't know that answer because I haven't taught that yet" into "I covered that and expected students to do better; now I know some students require intervention, and I might change the way I'm teaching that").
(Illuminateed.com)
Includes the instructional activities or approaches used to help students learn the curriculum. Process is how students come to make sense of and understand the key facts, concepts, generalizations and skills of a subject.
Teachers have several options if they want to differentiate by process:
- Acceleration/Pacing
- Student Interest
- Student Readiness
- Student Choice
- Differ amount of teacher and peer support
(Burden, P. R., Byrd, D. M. p. 44-45)
*an effective activity involves a student using an essential skill to understand an essential idea, and the activity is clearly focused on a learning goal.
Acceleration:
Acceleration simply means accelerating a student through the curriculum at a rate that places them ahead of where they would be in regular school curriculum. Example: If a student already has a firm grasp of the concepts you are teaching her in math then it would be reasonable to bring concepts from a higher grade level. When accelerating students standards must be examined and the teacher should make sure to notify the students following teacher, so that the student does not relearn content.
Pacing:
"Pacing a lesson so its nearly seamless takes expertise and practice -- and can be one of the greatest challenges for new teachers. For those more seasoned out there, here's a scenario many of us can relate to from the early days: way too much time for one learning activity, while not enough for another and clunky transitions in between."
Also on the teacher plate when it comes to instructional decisions that influence pacing? How best to chunk and scaffold content so it's grade-level appropriate and then deciding on the best instructional mode.
So let's take a look at the essentials when it comes to pacing the lesson and the learning:
1. Create a Sense of Urgency. The true art of pacing lies in creating a sense of urgency and also not leaving your students in the dust. Think diligent pace but not frenetic. This pacing feels just right to most learners in the room.
Using a timer on your desk can help create that "we are on the clock" feeling -- while moving steadily ahead proving ample wait/think time along the way. If a teacher question is asked of the whole group, don't expect an answer the first second or two, or three. Count to five when asking those particularly challenging questions. Sometimes we need to slow down in order to move the learning in the room forward.
2. Make Goals Clear. One way to avoid a clunky lesson pace is to make sure the learners know exactly what they are learning and doing for the day. "Our mission today is to discover... . We will be doing this by... ." Keep students focused as you transition from one learning activity to another, announcing how much closer they are to accomplishing the day's goal.
3. Have Smooth Transitions. Speaking of transitions, good ones demonstrate purposeful pacing and knowing next moves. Be thinking two steps ahead of the next activity, and begin setting up for the next activity without finishing the last. While students are completing one piece of the learning, pass out any materials, set up the projector, or have instructional notes in place so that there's little to no dead time between one learning activity to the next.
4. Be Sure Materials Are Ready. Doing this will let you keep the flow going. Have handouts, markers, scissors, and construction paper all in place. Many teachers create small supply containers of materials that include glue stick, scissors, highlighters, sticky notes, etc. and place it in the center of each collection of desks or team table. Each group can elect a Supplies Captain who keeps inventory and rounds up contents at the end of class time.
Photocopying can be the bane of the teacher's day. Do you really need to have the quiz or the writing prompt on individual copy paper? Can it be displayed on the projector screen instead? Can there be just one copy on the group table for all to look at? (Less passing out and collecting saves time and keeps the focus on the task at hand.)
5. Present Instructions Visually. This helps keep that pace uninterrupted. For each set of instructions, write them ahead of time on the board or have a slide in your PowerPoint or Prezi. If you are relying on giving oral directions only, think of those students that have poor listening skills: "What are we doing again?" What do we do after this?" The energy and time you take to make the instructions visible will pay off.
6. Check for Understanding. Taking time to see where your students are during the lesson and adjusting accordingly means formative assessments play a key role in pacing.
Pair and share creates energy in the room following direct instruction. Keep it in short spurts, breaking up every five to seven minutes of new information with "turn and talk with your elbow partner." Walk around the room and listen in to gauge understanding. These pauses for students to talk with each other can be as brief as 45 seconds. Also, use non-verbal quickies like thumbs up/thumbs down to see where students are and assess if more time or re-teaching is needed.
7. Choose Most Effective Type of Teaching. How will I get this new information to my students? Teachers must ask themselves this question continually when lesson planning. Sometimes new information is so new that students need to first see a visual representation and then require some information directly from their teacher to think about. Other times, it's best to set up a situation connecting to student schema and then group work to follow. Deciding the instructional mode (direct, student-centered, or facilitation) can be as important as choosing the content.
When that pacing seems off, is it time to switch the mode of delivery? Do they need a mini-lecture to clarify some misconceptions? Might a re-energizing activity be necessary, like a choral reading or class A-Z line up? Use a variety of activities with different formats to keep that flow and rhythm in the room.
How do you set up lessons so they flow? What pacing tips might you like to offer up that work well with your students?
(Alber)
Note: This is much more of an instructional strategy however, I included it on the curriculum tab because I wanted to keep acceleration and pacing together.
A pacing guide:
A pacing guide is sometimes referred to as a curriculum map, scope and sequence, standards schedule, instructional calendar, or road map. It is specific to a particular content area and level (e.g., 9th grade Algebra 1) and details when particular content standards should be taught and/or assessed. While still offering teachers flexibility on how to teach, its integration with common assessments is crucial to judging student progress (e.g., to turn "Students didn't know that answer because I haven't taught that yet" into "I covered that and expected students to do better; now I know some students require intervention, and I might change the way I'm teaching that").
(Illuminateed.com)

PRODUCTS:
Are the vehicles through which the students demonstrate what they have learned.
*Products may vary from actual physical products to student performances.
* A good product causes students to rethink what they have learned, apply what they can do, extend their understanding and skill and become involved in both critical and creative thinking.
Teachers have several options if they want to differentiate by product:
Please note that while all products may be an assessment, not all assessments are products.
Are the vehicles through which the students demonstrate what they have learned.
*Products may vary from actual physical products to student performances.
* A good product causes students to rethink what they have learned, apply what they can do, extend their understanding and skill and become involved in both critical and creative thinking.
Teachers have several options if they want to differentiate by product:
- Students design products around essential learning goals
- Product variation based on student readiness
- Variation of assessment
- Develop rubrics that allow for demonstration of both whole class and individual
- Use varied types of resources when preparing products
Please note that while all products may be an assessment, not all assessments are products.
